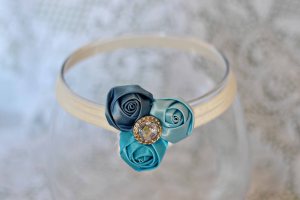
Last year I started making baby and toddler headbands for my daughter. From there my headband making grew a little and it turned into a small online business to fit in with maternity leave and only returning to work only part time.
My daughter used to be a fantastic model too and would leave her headbands on all day. Now that she’s 18 months old and very active, she still loves to wear headbands… for a few minutes… and only if she is putting them on herself. She refuses to keep anything on her head that I put there. Pity!
However it is so easy to make some of these pretty headbands for your own kids, for gifts or even for yourself. My niece is one of my biggest supporters. She is 21! Headbands are her ‘thing’.
It really is very easy to make some headbands of your own. I’m going to tell you how.
What you will need:
- Fold over elastic or stretch lace
- Fabric flowers, feathers, bling or other decorations
- Felt circles (or just felt you can cut)
- Scissors
- Glue gun and mat
You can buy fold over elastic by the length or many online stores sell the pre-made headbands so all you need to do is add your decorations.
Measure out your elastic/lace.
I have created these guides to help with sizing (featuring some favourite pics of my daughter when she was younger). One each in inches and centimetres depending on your preference. Feel free to print or pin them to Pinterest.
Of course if you have the person on hand, measuring their head is even better, making sure to add about 2CM to glue your elastic.
You can make your own fabric flowers out of scraps, tulle, chiffon etc, however I tend to purchase bulk pre-made flowers from wholesalers or online stores as they can be very time consuming.
Before you start gluing, plan how you want your headband to look.
Then simply glue your flowers & other items into place.
Finish your headband off with a felt circle or cut out a piece of felt to fit behind the headband. This provides a smooth soft base underneath your embellishments so it isn’t scratchy.
Once everything is dry (in about 5 minutes) you are done and ready to wear your pretty new accessory!
As far as headband styles go, use your imagination and see what works. I love to try new flower combos and add in different types of bling, buttons, ribbon etc. You can check out some of my current designs in my Etsy store.
And an added bonus, these are so quick and easy to make, it would be a fantastic mother/daughter or grandmother/granddaughter activity for a rainy afternoon!


Adorable!!
LikeLike
🙂
LikeLike
These are adorable, I remember only using a small bow on my babies!! Thanks fo sharing at Weekends Are Fun!!! Enjoy your day, and Happy Fathers Day to all those in your family!!
Now following Pinterest, FB Twitter. Tweeted the post too!!
LikeLike
Thank you. Sneaky wordpress had your comment in the spam folder for some reason so sorry for the slow reply. Fathers day is in September here in Australia. I have no idea why it’s different. Thanks for following along and for the great linky 🙂
LikeLike
Great post!! The folks who sell these sell them at such a high price!! How nice of you to share the information for people to make their own!
LikeLike
Great Post! The folks who sell these sell them at such a high price – how nice of you to share the info so people can make their own!
LikeLiked by 1 person
Thank you. Happy to share the process as they really are so easy 🙂
LikeLike
Beautiful! And thanks for the great ideas – I hope to have another little girl some day and will definitely enjoy making my own headbands for her, I do. 😀
LikeLike